Check For updates
To make sure that you have the latest libraries and packages for your Linux OS, launch the terminal from the menu or using the shortcut key Cntrl + Alt + T and enter the following command.
$ sudo apt update && sudo apt upgrade -yDFLAB NEMESIS is a bootable forensic Linux distribution based on Ubuntu and is developed and provided by DFLAB. The boot process has been modified to assure that the internal or external media of computers and devices are not modified or mounted. Once booted, the user will find a host of precompiled open-source forensic tools that can be used to perform various tasks.
In order to safely boot NEMESIS on standard PCs please make sure that you are comfortable with the following:
● Disabling Secure BootSecure Boot is a security standard found in modern computers that only allows software trusted by the PC manufacturer to boot the computer. If Secure Boot is enabled on a PC it will most likely need to be disabled to boot NEMESIS which is based on Linux. To disable Secure Boot you will need to enter the BIOS/UEFI Setup Utility.
This is done by powering on the PC and pressing a “catch” key. This “catch” key can be different for every PC. The “catch” key is usually displayed for a couple of seconds after pressing the power key to turn on the PC. Common examples of BIOS/UEFI Setup Utility “catch” keys are: ESC, F1 or F2 keys.
Once you have safely entered the BIOS/UEFI Setup Utility you will need to find the “Security” menu where you can disable the Secure Boot option and save the changes. Once the Secure Boot option is disabled and the changes are saved you can then power off the computer, restart and boot with NEMESIS OS.
Many PCs have a “catch” key to display a Boot Manager where the boot device can be selected without entering the BIOS/UEFI Setup Utility. Common examples of Boot Manager “catch” keys for some PCs are: F10 or F12. Once the Boot Manager is displayed choose the device where the NEMESIS-OS USB is inserted.
Default username and password for NEMESIS-OS:
Username: user
Password: 1234
To make sure that you have the latest libraries and packages for your Linux OS, launch the terminal from the menu or using the shortcut key Cntrl + Alt + T and enter the following command.
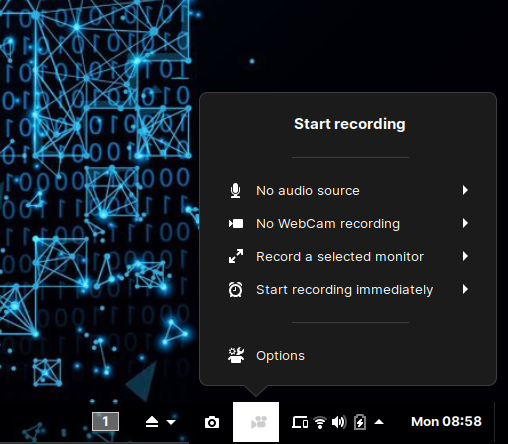
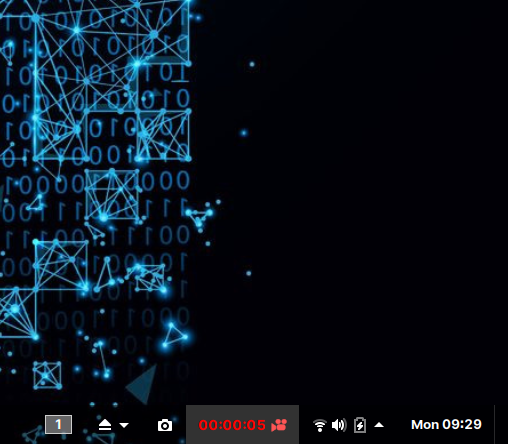
$ sudo apt update && sudo apt upgrade -yThere are many reasons why anyone working in the digital forensics/incident response profession should have the ability to record the screen of their computer. Whether it is recording the actions taken during an investigation so another person can replicate them, recording an adversaries activity on a victim machine, or simply creating some training videos, screen recordings are a great source of information.
Screen recordings are a much better solution than trying to do a live demonstration of technology and it allows the presenter to be confident in the results.
It is the job of an investigator to record what he sees and hears in such a way that it can be used in court to show what the resource did at the time of the investigation.
Without a recording, valuable evidence can disappear. A Web page or a Facebook wall, for instance, may display one thing now and something different five minutes later.
The forensic imager contained in this package, guymager, was designed to support different image file formats, to be most user-friendly and to run fast. It has a high speed multi-threaded engine using parallel compression for best performance on multi-processor and hyper-threading machines.
The application is based on libewf and libguytools. Guymager is included in many popular distributions.
On NEMESIS-OS the auto-mount options are disabled by default. Disabling auto-mounting is necessary to make sure that nothing changes on the original disk.
Click on the "Autopsy" icon on the desktop. Follow the on-screen instructions.
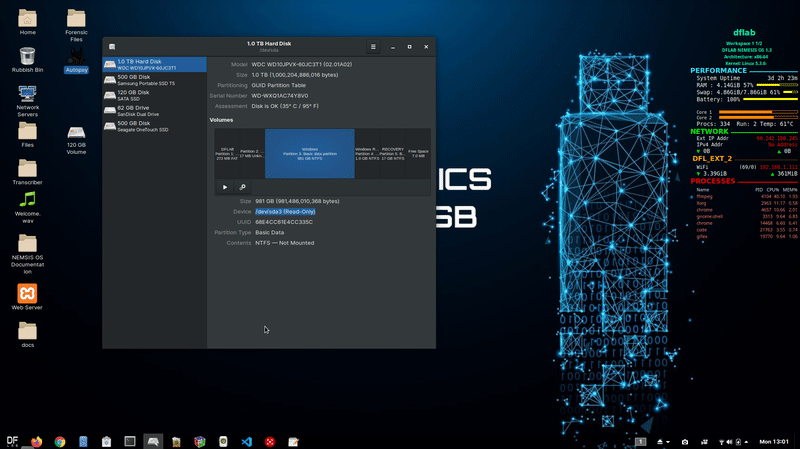
Step 1- Open Disk Utility
Step 2- Open Terminal & Mount
$ sudo mkdir /media/$USER/investigation$ sudo mount -o ro,noatime,noload,loop /dev/drive /media/$USER/investigation && sudo /sbin/blockdev --setro /dev/drive$ sudo umount /media/$USER/investigation$ sudo rm -rf /media/$USER/investigationTo preserve the original metadata you need to execute the following command from the terminal:
$ sudo cp -rp /source/dir /destination/dir For PDF metadata analysis you need to execute the following command from the terminal:
$ spdfinfo /source/dir For digital images metadata analysis you need to execute the following command from the terminal:
$ identify -verbose /source/dir